MFC: Difference between revisions
No edit summary |
mNo edit summary |
||
| Line 15: | Line 15: | ||
By sensing the electrical activity of the microbes, can we get some idea of how active, happy and healthy the microbiome of our sample is? | By sensing the electrical activity of the microbes, can we get some idea of how active, happy and healthy the microbiome of our sample is? | ||
== FUEL CELL INGREDIENTS == | == FUEL CELL INGREDIENTS == | ||
[[File:Ceramic pot.png|alt=A small, orangey-brown terracotta plant pot|thumb|ceramic plant pot (semi permeable membrane)|196x196px]] | [[File:Ceramic pot.png|alt=A small, orangey-brown terracotta plant pot|thumb|ceramic plant pot (semi permeable membrane)|196x196px]] | ||
+ Ceramic Plant pot diameter - 1 per fuel cell. Many smaller ones work better than big ones.<br> | |||
+ graphite powder - 1 tablespoon per cell (art stores sell this) or you can use graphite spray (noxious and expensive)<br> | |||
+ Gluten powder to make seitan, for the electrode, which you can also make yourself from wheat flour (~ 6 spoons for 4 cells) OR carbon cloth (expensive)<br> | |||
+ If not using carbon cloth, then you would need activated charcoal powder to mix with the seitan (6 spoons for 4 cells). You can find this at aquarium stores for cheap, but also health food stores etc. | + If not using carbon cloth, then you would need activated charcoal powder to mix with the seitan (6 spoons for 4 cells). You can find this at aquarium stores for cheap, but also health food stores etc. | ||
OR we make our own: need a bag of fire wood, ,lemons, equipment: large sealable glass containers, stovetop, large metal cooking pot, food processor, sieve, surgical/dust mask. This is cheaper and more hands-on, also to collect the ash which we could use later on to capture nitrogen if using urine, and neutralize the smell. I used this great recipe which is based more on activated charcoal's properties of purifying water and air: https://www.wikihow.com/Make-Activated-Charcoal | OR we make our own: need a bag of fire wood, ,lemons, equipment: large sealable glass containers, stovetop, large metal cooking pot, food processor, sieve, surgical/dust mask. This is cheaper and more hands-on, also to collect the ash which we could use later on to capture nitrogen if using urine, and neutralize the smell. I used this great recipe which is based more on activated charcoal's properties of purifying water and air: https://www.wikihow.com/Make-Activated-Charcoal | ||
+ non-corrosive wire - aprox. 5cm per fuel cell OR thick solder also works (lead-free) | + non-corrosive wire - aprox. 5cm per fuel cell OR thick solder also works (lead-free)<br> | ||
[[File:Aluminium mesh.png|alt=A hand with pink nailpolish holding a piece of fine aluminium mesh against a pink background|thumb|aluminium mesh (current collector)|341x341px]] | [[File:Aluminium mesh.png|alt=A hand with pink nailpolish holding a piece of fine aluminium mesh against a pink background|thumb|aluminium mesh (current collector)|341x341px]] | ||
+ crocodile clips: 2 per cell | + crocodile clips: 2 per cell<br> | ||
+ wooden stick, the same diameter as the ceramic pot’s holes, and/or some glue or putty (non-conductive, non-porous, water tight) to fill the drainage hole of the plant pot (without it we would make a short circuit!)<br> | |||
+ wooden stick, the same diameter as the ceramic pot’s holes, and/or some glue or putty (non-conductive, non-porous, water tight) to fill the drainage hole of the plant pot (without it we would make a short circuit!) | |||
+ Fine, flexible Aluminium Mesh (Sometimes sold as “Insect Mesh” at hardware stores) | + Fine, flexible Aluminium Mesh (Sometimes sold as “Insect Mesh” at hardware stores) | ||
== INSTRUCTIONS: == | == INSTRUCTIONS: == | ||
=== 001 Charcoal Cathode === | === 001 Charcoal Cathode === | ||
| Line 48: | Line 43: | ||
[[File:Making bioelectrodes.png|alt=hands covered in gooey black matter, which is seitan mixed with charcoal|thumb|making bioelectrodes with seitan and charcoal |253x253px]] | [[File:Making bioelectrodes.png|alt=hands covered in gooey black matter, which is seitan mixed with charcoal|thumb|making bioelectrodes with seitan and charcoal |253x253px]] | ||
+ Make a rectangle of the putty and Sculpt it onto the inside of the ceramic pot. Take care to not get it on the top lip of the pot (short circuit!), and to try have an even covering over the pot, including the base. | + Add +- 250ml of water, kneading well, until you have a kind of pastey-putty. It’s pretty hard to work with – but this is why we use it, as it keeps its shape, even in liquid. | ||
+ Make a rectangle of the putty and Sculpt it onto the inside of the ceramic pot. Take care to not get it on the top lip of the pot (short circuit!), and to try have an even covering over the pot, including the base. | |||
+ If you have access to a microwave then put in the pots for about 8-10 minutes on high (with a cool down break in between) – keep a close watch for them getting too dry and catching on fire! | |||
+ Cut a piece of aluminium mesh and wrap it on the inside of the pot, trying to make as much contact with the electrode as possible. If you don’t have a microwave, but have an oven you can do this step with the wet electrodes, and bake them together for extra conductivity. Bake them on a low-ish setting until they have puffed up and are totally hard. | |||
+ Cut a piece of aluminium mesh and wrap it on the inside of the pot, trying to make as much contact with the electrode as possible. If you don’t have a microwave, but have an oven you can do this step with the wet electrodes, and bake them together for extra conductivity. Bake them on a low-ish setting until they have puffed up and are totally hard. | |||
+ The longer it can dry out, the better. | + The longer it can dry out, the better. | ||
| Line 72: | Line 67: | ||
+ 3/4 Fill your pot with the cathode with your anaerobic substrate of choice - urine, compost, old ferments, mud, mini swamps, chicken poo, .... If your substrate is too solid (e.g. cow poo), mix some water with it – wild water with its own microorganisms and no chemicals/treatment is best. | + 3/4 Fill your pot with the cathode with your anaerobic substrate of choice - urine, compost, old ferments, mud, mini swamps, chicken poo, .... If your substrate is too solid (e.g. cow poo), mix some water with it – wild water with its own microorganisms and no chemicals/treatment is best. | ||
+Take care not to disrupt any ecosystems when collecting substrate, or wasting edible food - only use things that are going to “waste”. healthy topsoil, for instance, is in a state of global crisis, so we do not want to remove this from ecosystems. | + Take care not to disrupt any ecosystems when collecting substrate, or wasting edible food - only use things that are going to “waste”. healthy topsoil, for instance, is in a state of global crisis, so we do not want to remove this from ecosystems. | ||
'''What’s best is if you are making compost, this fuel cell acts as the biodigester, while things get broken down. This means that in the composting process, you can also get some electricity out!''' | '''What’s best is if you are making compost, this fuel cell acts as the biodigester, while things get broken down. This means that in the composting process, you can also get some electricity out!''' | ||
| Line 84: | Line 79: | ||
=== 004 Using the Cells === | === 004 Using the Cells === | ||
[[File:Image.png|alt=A person with long hair, wearing a jacket with a Feminist Farmers badge sits on the ground in a car park connecting fuel cells, which are housed in random containers |thumb|Hooking up Fuel cells in the car park]] | [[File:Image.png|alt=A person with long hair, wearing a jacket with a Feminist Farmers badge sits on the ground in a car park connecting fuel cells, which are housed in random containers |thumb|Hooking up Fuel cells in the car park]] | ||
With this recipe, each cell should usually produce around 500 millivolts, and a very small current. Depending on your application, you can play around with putting the cells in parallel and/ or series - putting them in series (- to +, - to +...) will make a higher voltage, and putting them in parallel (+ to +, - to -), will create more current / amps. | With this recipe, each cell should usually produce around 500 millivolts, and a very small current. Depending on your application, you can play around with putting the cells in parallel and/ or series - putting them in series (- to +, - to +...) will make a higher voltage, and putting them in parallel (+ to +, - to -), will create more current / amps. | ||
So far we have powered homemade electronic musical instruments, LEDs, and even a small microcontroller module (ATTINY45 sound module). What else could we power with them? | So far we have powered homemade electronic musical instruments, LEDs, and even a small microcontroller module (ATTINY45 sound module). What else could we power with them? | ||
Revision as of 16:26, 2 June 2023
Power up with an Anaerobic work out
Refuturing our imaginations when it comes to energy generation, electrical technologies, waste, and the power dynamics which permeate these narratives is at the core of this ongoing project. Here, we uncover wild electricity by making Microbial Fuel Cells from non-specialist and environmentally friendly materials - and seeing what and how we can power things with them.
Making our own electricity from scratch, the project aims to empower us end users of electricity, while questioning and demystifying the mainstream narratives of production, storage, transmission and consumption of this curious force. Working with the magical world of microbes, we can gain a deeper respect for these vital organisms, while investigating how electronics can work with such low power. It also gives us an occasion learn from other organisms who work with electricity in a regenerative way in their ecosystems, instead of in a toxic way, like much human engineering does.
In line with ideas of regenerative practices, where maintaining or sustaining is usurped by the drive to improve or enhance the environment, the electricity-producing MFCs have the multi-function of simultaneous wastewater treatment and nutrient recovery which can help to restore soil health. Exploring bio-materials, eco-electronics and rethinking how we think about waste, The project aims to foster a culture of radical sustainability and awareness relating to energy generation and usage, and provide us with hands-on, yet playful, energetic agency.
Caring for Microorganisms = Caring for our Bodies = Caring for the Planet
Even though they are super small, there are so many microorganisms, and so many different types; there are whole universes of life and activity in the smallest droplets of water, the tiniest pinch of soil, or the softest skin swab. They play a big role in aLL ecosystemS - including our own bodies - existing in symbiosis with many other organisms, as well as being really important decomposers, recycling nutrients for planetary cycles. Caring for helpful micro-organisms means a healthy body and planet!
In the Microbial Fuel Cells, we are harvesting the electricity from electro-active bacteria, specifically ones called "electrogens" which basically fart out electrons, or "transfer electrons extracellularly across the cell envelope to or from electron acceptors including electrodes, oxide minerals, and other bacteria" (Tahernia M et al. 2020). There are also electrotrophs, that basically eat electricity for their metabolic processes. These bacteria are found in places without or with low amounts of oxygen, such as compost, pee, swamps, fermented foods, etc. As such, they're called anaerobic bacteria.
By sensing the electrical activity of the microbes, can we get some idea of how active, happy and healthy the microbiome of our sample is?
FUEL CELL INGREDIENTS
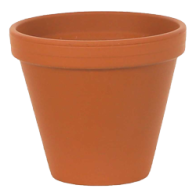
+ Ceramic Plant pot diameter - 1 per fuel cell. Many smaller ones work better than big ones.
+ graphite powder - 1 tablespoon per cell (art stores sell this) or you can use graphite spray (noxious and expensive)
+ Gluten powder to make seitan, for the electrode, which you can also make yourself from wheat flour (~ 6 spoons for 4 cells) OR carbon cloth (expensive)
+ If not using carbon cloth, then you would need activated charcoal powder to mix with the seitan (6 spoons for 4 cells). You can find this at aquarium stores for cheap, but also health food stores etc.
OR we make our own: need a bag of fire wood, ,lemons, equipment: large sealable glass containers, stovetop, large metal cooking pot, food processor, sieve, surgical/dust mask. This is cheaper and more hands-on, also to collect the ash which we could use later on to capture nitrogen if using urine, and neutralize the smell. I used this great recipe which is based more on activated charcoal's properties of purifying water and air: https://www.wikihow.com/Make-Activated-Charcoal
+ non-corrosive wire - aprox. 5cm per fuel cell OR thick solder also works (lead-free)
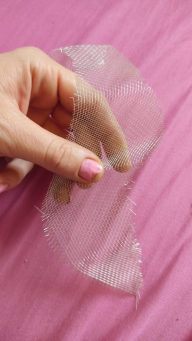
+ crocodile clips: 2 per cell
+ wooden stick, the same diameter as the ceramic pot’s holes, and/or some glue or putty (non-conductive, non-porous, water tight) to fill the drainage hole of the plant pot (without it we would make a short circuit!)
+ Fine, flexible Aluminium Mesh (Sometimes sold as “Insect Mesh” at hardware stores)
INSTRUCTIONS:
001 Charcoal Cathode
+ Fill holes of pots with wood/ glue / putty and let it dry.
+ If you have carbon cloth, you can cut a piece and wrap it on the inside of the pot, and then skip the rest of the steps below, but you need to put aluminium mesh on too (this acts as the “current collector”)
+ If you are making your bioelectrodes from scratch: Make dry mixture of 50% gluten powder to 50% activated charcoal. Sometimes the activated charcoal isn’t in powder form, but try mash it up as much as possible if you have the granules.
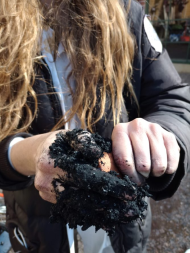
+ Add +- 250ml of water, kneading well, until you have a kind of pastey-putty. It’s pretty hard to work with – but this is why we use it, as it keeps its shape, even in liquid. + Make a rectangle of the putty and Sculpt it onto the inside of the ceramic pot. Take care to not get it on the top lip of the pot (short circuit!), and to try have an even covering over the pot, including the base.
+ If you have access to a microwave then put in the pots for about 8-10 minutes on high (with a cool down break in between) – keep a close watch for them getting too dry and catching on fire!
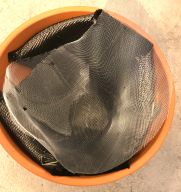
+ Cut a piece of aluminium mesh and wrap it on the inside of the pot, trying to make as much contact with the electrode as possible. If you don’t have a microwave, but have an oven you can do this step with the wet electrodes, and bake them together for extra conductivity. Bake them on a low-ish setting until they have puffed up and are totally hard.
+ The longer it can dry out, the better.
002 Graphite Anode
+ Dip your finger into the graphite powder and rub / smear it onto the outside of the ceramic pot, until it’s all covered in a smooth, even layer, taking care to not make a short circuit with the cathode. Presumably you could also just scribble on it with a high graphite content pencil like the ones you get at art stores (8B, etc). But we haven't tried this yet (there is some ceramic mixed with the pencil's graphite).
+ Find a way to make contact with the non-corrosive wire and the graphite on the pot. This can be tricky, but you could put the pot on top of the wire, attach with an elastic band, or even just lean it on. If you come up with a better design, please share! I found that making holders of aluminium foil for the bottom doesn’t work so well, as if there is any liquid leaking from the bottom (even just through he porous ceramic), it will make a short circuit, and so its not so good.
003 Where The Magic Happens
+ 3/4 Fill your pot with the cathode with your anaerobic substrate of choice - urine, compost, old ferments, mud, mini swamps, chicken poo, .... If your substrate is too solid (e.g. cow poo), mix some water with it – wild water with its own microorganisms and no chemicals/treatment is best.
+ Take care not to disrupt any ecosystems when collecting substrate, or wasting edible food - only use things that are going to “waste”. healthy topsoil, for instance, is in a state of global crisis, so we do not want to remove this from ecosystems.
What’s best is if you are making compost, this fuel cell acts as the biodigester, while things get broken down. This means that in the composting process, you can also get some electricity out!
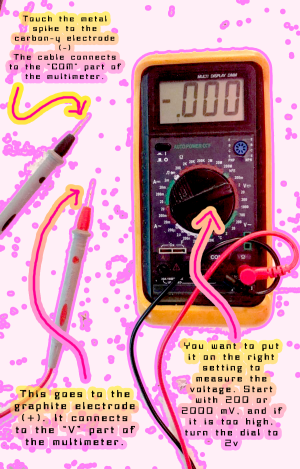
+ Take out the multimeter, attach the cathode crocodile clip to the negative (-) terminal of the multimeter, and the anode to the positive (+).
+ TEST THE VOLTAGE!
+ You could also make the fuel cells "inside out", with graphite on the inside of the pot, and carbon on the outside. Then you can for instance float the cell in a substrate, or the soil, etc. I'm not sure how ecosystems feel about this though, and of course if you want to make an array of cells, they will all be in parallel as they will share a common ground (the liquidy-conductive substrate).
004 Using the Cells
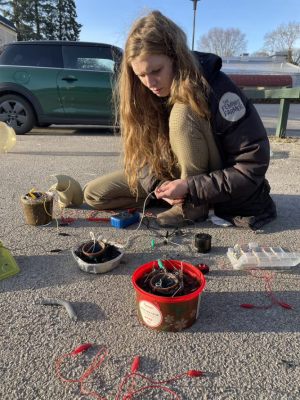
With this recipe, each cell should usually produce around 500 millivolts, and a very small current. Depending on your application, you can play around with putting the cells in parallel and/ or series - putting them in series (- to +, - to +...) will make a higher voltage, and putting them in parallel (+ to +, - to -), will create more current / amps.
So far we have powered homemade electronic musical instruments, LEDs, and even a small microcontroller module (ATTINY45 sound module). What else could we power with them?