SporesandMore: Difference between revisions
No edit summary |
|||
| (13 intermediate revisions by 2 users not shown) | |||
| Line 1: | Line 1: | ||
== INTRODUCTION == | == INTRODUCTION == | ||
“How fungi arrived in our world has been a prod to the human imagination. In Lithuania, fungi were once considered the fingers of Velnias, the one-eyed Baltic god of the dead, reaching up from the underworld to feed the poor. And in the contemporary inuit in the central canadian artic belive that mushrooms are the anaq (shit) of shooting stars as they often appears on the tundra the morning after a shooting star leaves a trail of detrious across the night sky.” Fungipedia, written by Lawrence Millman. | “How fungi arrived in our world has been a prod to the human imagination. In Lithuania, fungi were once considered the fingers of Velnias, the one-eyed Baltic god of the dead, reaching up from the underworld to feed the poor. And in the contemporary inuit in the central canadian artic belive that mushrooms are the anaq (shit) of shooting stars as they often appears on the tundra the morning after a shooting star leaves a trail of detrious across the night sky.” ''Fungipedia'' (2019), written by Lawrence Millman. | ||
In Regenerative Energy Communities we are reaching for “new imaginaries” to highlight and contribute to a broader discussion and new perspective around resource efficient energy use and practices. We approach this by developing alternative energy solutions in the form of small scale prototypes such as mushroom based | In Regenerative Energy Communities we are reaching for “new imaginaries” to highlight and contribute to a broader discussion and new perspective around resource efficient energy use and practices. We approach this by developing alternative energy solutions in the form of small scale prototypes, such as mushroom based windturbines, and look at how these can be used in regenerative agriculture work of local farming communities. | ||
In our practice we introduce a range of what we characterize as regenerative methods and practices | In our practice we introduce a range of what we characterize as regenerative methods and practices, designing with compost-promoting regenerative materials, hybrid combinations of computational tools and biological processes, slow engineering, speculative poetics and a transdisciplinarity situated within the longstanding innovations and emerging traditions of various agroecological communities. | ||
We (amongst others) think that mycelium (mushrooms own root | We (amongst others) think that mycelium (mushrooms' own root systems) can be a formidable alternative as a regenerative material in constructional applications, including in windturbines. It also holds the possibility to promote soil health and mycoremediation of heavy metals from topsoil (mycoremediation being a fungi-based remediation that is able to remove a range of different contaminants from damaged environments). | ||
As we now discuss quite often what the future would look like in terms of a sustainable energy transition, we find it interesting to pose the question: what if everybody could grow their own energy source? | |||
[[File:Pillow.jpg|thumb|Mushroom pillow!]] | |||
<div class="pagebreak"></div> | |||
== STERILE ENVIRONMENT AND CLEAN WORKING SPACE == | == STERILE ENVIRONMENT AND CLEAN WORKING SPACE == | ||
[[File:Spores.png|thumb|Cultivating!]] | [[File:Spores.png|thumb|Cultivating!]] | ||
It is important to mention that bacteria and moulds also like mushrooms or fungi, and therefor we want to make sure to reduce the possibility of contaminating our cultivation and out-compete the mushroom culture. Make sure you wash your hands and wipe the surface area where you will be working with any alcohol or hand sanitizer. Always wipe all the tools and gear you intend to use as well. | |||
== COLLECTING MUSHROOM | == COLLECTING MUSHROOM SAMPLES == | ||
[[File:Openlab.png|thumb|Open Lab ]] | |||
There are a number of ways to proceed and this zine should only be seen as a simplified version that is not a complete guide, but rather covers a very basic outline to learn more about growing your own wind turbine. | |||
To start off, you are welcome to collect a spore sample from our “spore tap” in the exhibition, but you can also sample any fresh or living mushroom (the actual fruitbody of a mushroom) and cut it into small pieces. We recommend reshi (which you can pick up in the spore tap), as it is a fast growing suitable fungi for making constructional materials. | |||
== TRANSFER THE MUSHROOM CULTURE TO STERILIZED GRAIN JAR == | |||
The word mushroom is often used to refer to a fungus with an umbrella-shaped fruiting body, as well as pores and gills beneath the cap. It is good to know that yeast are not mushrooms, but are also fungi. Spores are simply the reproductive structures of mushrooms. This is how fungi reproduce and spread their fantastic-being-in-through-the-world. Mushroom spores are essentially microscopic and are usually found on the gills of mushrooms. | |||
The | The next step is to transfer the liquid culture (from the spore tap or any other mushroom gill sample) into a mason jar or any other similar jar of grain. You can use wheat, brown rice, white rice, wild bird seed and corn. The most commonly used here is arguably rye. However, before you transfer it, it is recommended to take a number of steps, including sterilisation with a pressure cooker. | ||
First rinse and clean the grain, soaking in water for a minimum 12 hours. Then cook the grains for 15-20 minutes so that they absorb water. Drain and dry excess moisture from the outside of the grains with a towel. Load grain into mason jars and sterilize for 90 minutes at 15 PSI in a pressure cooker. If you don't know the PSI, just make sure to boil to max then lower so it barely lets any steam out and rather go for 120 min instead of 90 min. | |||
When the grain jars have cooled down to room temperature, you could then introduce the liquid culture filled with spores or your other mushroom sample into the grain jar. The mushroom mycelium will start to grow across the grain, eventually taking over the entire jar. | |||
[[File:Taking over the jar.jpg|thumb|Taking over the jar]] | [[File:Taking over the jar.jpg|thumb|Taking over the jar]] | ||
== EXPANDING THE GRAIN JAR WITH AGRICULTURAL WASTE AS MAIN MATERIAL == | == EXPANDING THE GRAIN JAR WITH AGRICULTURAL WASTE AS MAIN MATERIAL == | ||
When the mycelium has taken over the jar, it is time to move it all to expand into a bigger bulk of what will be your main turbine material. | When the mycelium has taken over the jar, it is time to move it all to expand into a bigger bulk of what will be your main turbine material. | ||
We typically use sawdust consisting of softwoods but also sometimes mixed hardwoods from a wood | We typically use sawdust consisting of softwoods, but also sometimes mixed hardwoods from a wood or carpentry workshop nearby. But you could essentially use any mix of agricultural waste. Typical substrates include straw, saw dust or compost. Depending on the type of substrate that you use, it will also have to be pasteurized or sterilized prior to inoculation. How much you could expand your grain jar is hard to say, but roughly it's good practice to stay between a ratio of 1:5 – 1:10 ratio of grain jar to every agricultural waste you wish to expand. It is also possible to give it more food and nutrition by adding some wheatflour to the mix, approx around 25g per kg substrate. | ||
Make sure to spray some water to keep the whole mix lightly humid. We usually use a plastic storage box, typically made of polypropolyne but there are special growbags with airfilters such as the one in this photo. | |||
[[File:Growbag.jpg|thumb|Grow bag]] | [[File:Growbag.jpg|thumb|Grow bag]] | ||
But you could take any plastic bowl and cover it with clingfilm/foodwrap and poke tiny holes in the film every 4-5 cm or so. Remember to sterilise it by wipe it down with some alcohol first. | |||
You will now let it grow and colonise the full box, which | You will now let it grow and colonise the full box, which takes around 7-10 days if you use reshi. | ||
[[File:BoxMyc.jpg|thumb|It should look like this!]] | [[File:BoxMyc.jpg|thumb|It should look like this!]] | ||
== MAKING A | <div class="pagebreak"></div> | ||
== MAKING A MOLD & MIX IN THE SUBSTRATE == | |||
You are welcome to use our | [[File:Mould.jpg|thumb|Downloadable mold from REC]] | ||
You are welcome to use our 3d turbine molds by either downloading from our webpage https://regenerative-energy-communities.org/ and 3D-printing them yourself if you have access to a 3D-printer or makerspace. Or, you could also borrow a 3D-printed mold here from the exhibition library. | |||
You could choose from two different kinds of wind turbine. | You could choose from two different kinds of wind turbine. | ||
The helix variant | The helix variant that we call “Spinny spinny” has a horizontal axis and is more efficient in lower winds on low altitudes, such as on low land on the ground. <br /> | ||
The “Finny | The “Finny finny” mold has a vertical axis and is more suitble for being located higher up, such as a balcony or tower. | ||
[[File:Spinny.jpg|thumb|Finny Finny]] | [[File:Spinny.jpg|thumb|Finny Finny]] | ||
At this stage, you take the bulk of mycelium that you have grown and break it into small pieces and add additional wheatflour, approx 25-50 grams per kilo of substrate. This should make the substrate somewhat “sticky” and manageable to give it the consistency to mold it. Spray water or add more wheatflour to achieve a “sticky or sculpting” mix. When you have achieve the right consistency, you need to pat the substrate down so that it adheres to the mold. If you like, it is also good to wrap the mold in clingfilm/foodwrap, as it will aid the process of de-molding and getting the final part out later. | |||
Next place the | Next, place the molds with substrate in a plastic box so it may hold its humidity and to once more grow its mycelium across the substrate and bind together a wing. This will take roughly 4-7 days. It is then time for the next step. | ||
== DE- | == DE-MOLD AND DRY MYCELIUM WING == | ||
The substrate in the | The substrate in the mold(s) should be all covered with white mycelium, it is then time to de-mold your part. | ||
Take your | Take your mold(s) out from the box and leave them to air-dry approx 5-10 days, dependent on the thickness. You are then ready to demold your final mycelium piece from the 3D print. If you like, it is possible but not required to strengthen them and make them even more tougher by placing them in an oven lat +/- 40° C for 3-4 hours with the door a bit open so the moisture can escape. Then bake off at 80°C for 2 hours. | ||
[[File:Wings.jpg|thumb|Assembling the turbine]] | [[File:Wings.jpg|thumb|Assembling the turbine]] | ||
| Line 71: | Line 73: | ||
You may download the rest of the 3D printed parts to assemble a “stem” with the mycelium wings. | You may download the rest of the 3D printed parts to assemble a “stem” with the mycelium wings. | ||
== MAKING ELECTRICITY FROM E-WASTE MOTORS == | == MAKING ELECTRICITY FROM E-WASTE MOTORS == | ||
How it works: If you give electric current to a motor, it will spin. But if you spin the motor, it will give you an electric current due to the electro-magnetic field created between the copper coil and the magnets of the motor. It’s super important to make good use of old motors, like other e-waste, as the mining of these non-renewable raw minerals, as well as the recycling disposal of these components, are hazardous to human and environmental health. | How it works: If you give electric current to a motor, it will spin. But if you spin the motor, it will give you an electric current due to the electro-magnetic field created between the copper coil and the magnets of the motor. It’s super important to make good use of old motors, like other e-waste, as the mining of these non-renewable raw minerals, as well as the recycling disposal of these components, are hazardous to human and environmental health. | ||
| Line 80: | Line 82: | ||
If you use an AC motor you will need to convert the AC (Alternating current) electricity to DC (Direct current) to use with most low-voltage components, such as lights, capacitors, phone chargers, etc. To do this you will need a bridge rectifier, which you can buy as a single component, or make with 4 diodes. | If you use an AC motor you will need to convert the AC (Alternating current) electricity to DC (Direct current) to use with most low-voltage components, such as lights, capacitors, phone chargers, etc. To do this you will need a bridge rectifier, which you can buy as a single component, or make with 4 diodes. | ||
<div class="pagebreak"></div> | |||
== PLEASE SHARE YOUR CREATIONS WITH US == | == PLEASE SHARE YOUR CREATIONS WITH US == | ||
We would | We would so much love if you would like to share your wind turbine creations, related stories and photos and the struggles of “slow engineering”. Email us at: [mailto:team@regenerative-energy-communities.org team@regenerative-energy-communities.org] | ||
Latest revision as of 11:28, 7 June 2023
INTRODUCTION
“How fungi arrived in our world has been a prod to the human imagination. In Lithuania, fungi were once considered the fingers of Velnias, the one-eyed Baltic god of the dead, reaching up from the underworld to feed the poor. And in the contemporary inuit in the central canadian artic belive that mushrooms are the anaq (shit) of shooting stars as they often appears on the tundra the morning after a shooting star leaves a trail of detrious across the night sky.” Fungipedia (2019), written by Lawrence Millman.
In Regenerative Energy Communities we are reaching for “new imaginaries” to highlight and contribute to a broader discussion and new perspective around resource efficient energy use and practices. We approach this by developing alternative energy solutions in the form of small scale prototypes, such as mushroom based windturbines, and look at how these can be used in regenerative agriculture work of local farming communities.
In our practice we introduce a range of what we characterize as regenerative methods and practices, designing with compost-promoting regenerative materials, hybrid combinations of computational tools and biological processes, slow engineering, speculative poetics and a transdisciplinarity situated within the longstanding innovations and emerging traditions of various agroecological communities.
We (amongst others) think that mycelium (mushrooms' own root systems) can be a formidable alternative as a regenerative material in constructional applications, including in windturbines. It also holds the possibility to promote soil health and mycoremediation of heavy metals from topsoil (mycoremediation being a fungi-based remediation that is able to remove a range of different contaminants from damaged environments).
As we now discuss quite often what the future would look like in terms of a sustainable energy transition, we find it interesting to pose the question: what if everybody could grow their own energy source?
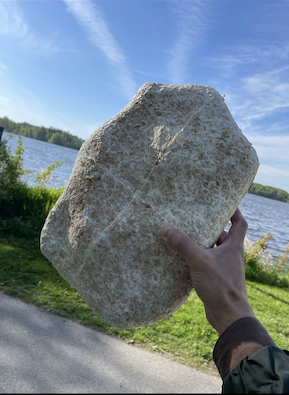
STERILE ENVIRONMENT AND CLEAN WORKING SPACE
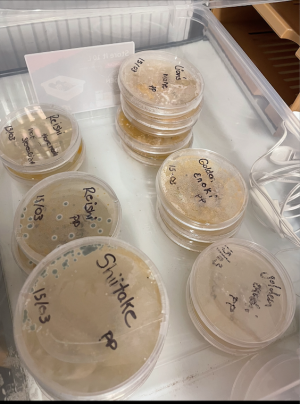
It is important to mention that bacteria and moulds also like mushrooms or fungi, and therefor we want to make sure to reduce the possibility of contaminating our cultivation and out-compete the mushroom culture. Make sure you wash your hands and wipe the surface area where you will be working with any alcohol or hand sanitizer. Always wipe all the tools and gear you intend to use as well.
COLLECTING MUSHROOM SAMPLES
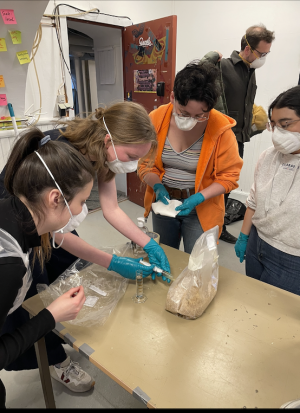
There are a number of ways to proceed and this zine should only be seen as a simplified version that is not a complete guide, but rather covers a very basic outline to learn more about growing your own wind turbine.
To start off, you are welcome to collect a spore sample from our “spore tap” in the exhibition, but you can also sample any fresh or living mushroom (the actual fruitbody of a mushroom) and cut it into small pieces. We recommend reshi (which you can pick up in the spore tap), as it is a fast growing suitable fungi for making constructional materials.
TRANSFER THE MUSHROOM CULTURE TO STERILIZED GRAIN JAR
The word mushroom is often used to refer to a fungus with an umbrella-shaped fruiting body, as well as pores and gills beneath the cap. It is good to know that yeast are not mushrooms, but are also fungi. Spores are simply the reproductive structures of mushrooms. This is how fungi reproduce and spread their fantastic-being-in-through-the-world. Mushroom spores are essentially microscopic and are usually found on the gills of mushrooms.
The next step is to transfer the liquid culture (from the spore tap or any other mushroom gill sample) into a mason jar or any other similar jar of grain. You can use wheat, brown rice, white rice, wild bird seed and corn. The most commonly used here is arguably rye. However, before you transfer it, it is recommended to take a number of steps, including sterilisation with a pressure cooker.
First rinse and clean the grain, soaking in water for a minimum 12 hours. Then cook the grains for 15-20 minutes so that they absorb water. Drain and dry excess moisture from the outside of the grains with a towel. Load grain into mason jars and sterilize for 90 minutes at 15 PSI in a pressure cooker. If you don't know the PSI, just make sure to boil to max then lower so it barely lets any steam out and rather go for 120 min instead of 90 min.
When the grain jars have cooled down to room temperature, you could then introduce the liquid culture filled with spores or your other mushroom sample into the grain jar. The mushroom mycelium will start to grow across the grain, eventually taking over the entire jar.
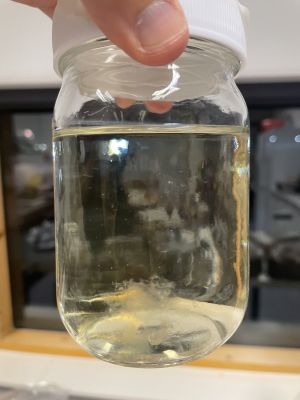
EXPANDING THE GRAIN JAR WITH AGRICULTURAL WASTE AS MAIN MATERIAL
When the mycelium has taken over the jar, it is time to move it all to expand into a bigger bulk of what will be your main turbine material.
We typically use sawdust consisting of softwoods, but also sometimes mixed hardwoods from a wood or carpentry workshop nearby. But you could essentially use any mix of agricultural waste. Typical substrates include straw, saw dust or compost. Depending on the type of substrate that you use, it will also have to be pasteurized or sterilized prior to inoculation. How much you could expand your grain jar is hard to say, but roughly it's good practice to stay between a ratio of 1:5 – 1:10 ratio of grain jar to every agricultural waste you wish to expand. It is also possible to give it more food and nutrition by adding some wheatflour to the mix, approx around 25g per kg substrate.
Make sure to spray some water to keep the whole mix lightly humid. We usually use a plastic storage box, typically made of polypropolyne but there are special growbags with airfilters such as the one in this photo.
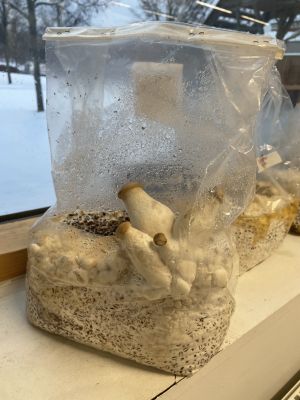
But you could take any plastic bowl and cover it with clingfilm/foodwrap and poke tiny holes in the film every 4-5 cm or so. Remember to sterilise it by wipe it down with some alcohol first.
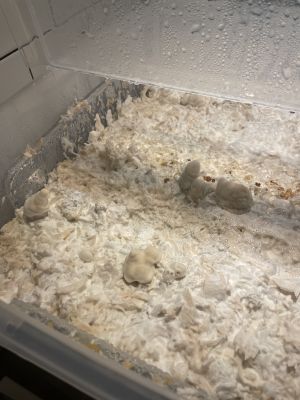
You will now let it grow and colonise the full box, which takes around 7-10 days if you use reshi.
MAKING A MOLD & MIX IN THE SUBSTRATE
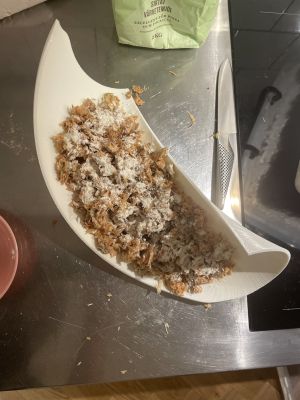
You are welcome to use our 3d turbine molds by either downloading from our webpage https://regenerative-energy-communities.org/ and 3D-printing them yourself if you have access to a 3D-printer or makerspace. Or, you could also borrow a 3D-printed mold here from the exhibition library.
You could choose from two different kinds of wind turbine.
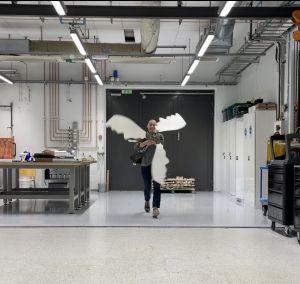
The helix variant that we call “Spinny spinny” has a horizontal axis and is more efficient in lower winds on low altitudes, such as on low land on the ground.
The “Finny finny” mold has a vertical axis and is more suitble for being located higher up, such as a balcony or tower.
At this stage, you take the bulk of mycelium that you have grown and break it into small pieces and add additional wheatflour, approx 25-50 grams per kilo of substrate. This should make the substrate somewhat “sticky” and manageable to give it the consistency to mold it. Spray water or add more wheatflour to achieve a “sticky or sculpting” mix. When you have achieve the right consistency, you need to pat the substrate down so that it adheres to the mold. If you like, it is also good to wrap the mold in clingfilm/foodwrap, as it will aid the process of de-molding and getting the final part out later.
Next, place the molds with substrate in a plastic box so it may hold its humidity and to once more grow its mycelium across the substrate and bind together a wing. This will take roughly 4-7 days. It is then time for the next step.
DE-MOLD AND DRY MYCELIUM WING
The substrate in the mold(s) should be all covered with white mycelium, it is then time to de-mold your part.
Take your mold(s) out from the box and leave them to air-dry approx 5-10 days, dependent on the thickness. You are then ready to demold your final mycelium piece from the 3D print. If you like, it is possible but not required to strengthen them and make them even more tougher by placing them in an oven lat +/- 40° C for 3-4 hours with the door a bit open so the moisture can escape. Then bake off at 80°C for 2 hours.
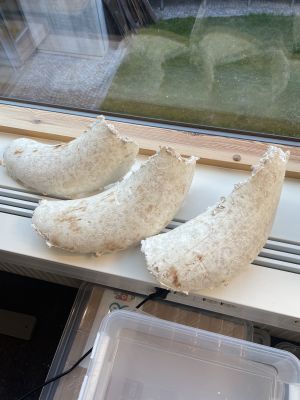
ASSEMBLE AND ENJOY YOUR CREATIONS
You may download the rest of the 3D printed parts to assemble a “stem” with the mycelium wings.
MAKING ELECTRICITY FROM E-WASTE MOTORS
How it works: If you give electric current to a motor, it will spin. But if you spin the motor, it will give you an electric current due to the electro-magnetic field created between the copper coil and the magnets of the motor. It’s super important to make good use of old motors, like other e-waste, as the mining of these non-renewable raw minerals, as well as the recycling disposal of these components, are hazardous to human and environmental health.
What works the best is to find an AC generator – these you can find in many appliances. We are using motors from an old industrial fridge which was being thrown out by our local grocery store, and work super well! Small DC motors are more common in e-waste, but they generate much less energy and so they may need some other energy harvesting circuitry to use, depending on your application.
You will need to make some kind of adapter for the motor to the turbine, and it’s important that it is really straight and centred, otherwise it wobbles a lot. We have some 3D files online that you can download and modify for fan-type motors (shaft motors coming soon!)
If you use an AC motor you will need to convert the AC (Alternating current) electricity to DC (Direct current) to use with most low-voltage components, such as lights, capacitors, phone chargers, etc. To do this you will need a bridge rectifier, which you can buy as a single component, or make with 4 diodes.
PLEASE SHARE YOUR CREATIONS WITH US
We would so much love if you would like to share your wind turbine creations, related stories and photos and the struggles of “slow engineering”. Email us at: team@regenerative-energy-communities.org